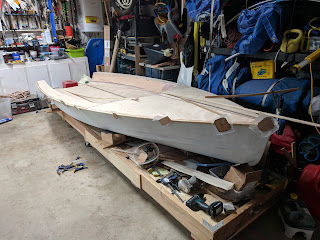
Posts

Showing posts from September, 2018

Inner Gunwhales on

Image
Oddly I feel a bit sad as this marks the main bulk of woodwork complete! Plenty left, I'm projecting finishing in February. But still a bit sad with this milestone. The inners were easier to attach than the outers. No screws needed. A little tricky to get the top overlap sorted. Ash was used and the side decks got 1/4" thick strips, not much wood but it's solid. I used a wider (but slightly thinner) strips at the front and planed them to shape rather than bent them. Because of the requirement to fit at the side deck they ended up quite thin under the mast step but I think I'll live with this. Starting to look quite sharp. After playing with the idea of making the gunwhales wrap around the bowplate I just cut them short - easier and less chance of water getting trapped in clever geometry.  Overall I think she looks quite sharp. A lot depends on how consistent the final colors are. Got a couple of areas of minor damage I need a soluti

Outer gunwhales on

Image
Took a bit of effort to glue. Clamped in the middle and worked out wards, lots of glue and a fair amount of squeeze out and cleanup. In one of the pictures you can see the custom clamping arrangement that allows you to adjust the edge overlap. The position of the ply governs the overlap. You want a little overlap to plane down and make the transition from the deck nice.

Ash Gunwhales

Image
Decided on Ash for several reasons. Firstly it's commonly used for gunwhales, secondly its numbers (see previous post) are ballpark in the right area and thirdly my localish hardwood store had a nice plank that would fit in my car. I'm pretty aware that the woodworking side of this project is passing. In a few months this boat should be on the water, and I'll be building something different for my daughter but still it feels a little sad to be wrapping up this phase. And exciting. Fitting out Farrout for sailing will be fun! Anyway, one of the last woodworking tasks was to put in a couple of scarff joints on the gunwhales. Not sure if they will hold yet (this wood is stiff and hard to bend) but here they are: One more piece of ash to rip. And some gluing and screwing. Then time to cover the deck with some protection while I work on the other bits; rudder gantry, foils, hardware supports, foot rests, mast step, and then finally onto rigging. I'm going

Gunwhale wood considerations

ash - 42 lbs per cubic ft - hardness 1320 - rupture 15000 - crushing 7400 - elastic 1740000 - perishable / slightly durable, easy to steam and work in general cvg fir (numbers for red fir) - 27 lbs/ft3 - hardness 500 - rupture 10370 - crushing 5410 - elastic 1483000 - (red fir) perishable, easy to work meranti mahogony - 30 lbs/ft3 - hardness 550 - rupture 11200 - crushing 6120 - elastic 1652000 - perishable / slightly durable, easy to steam and work in general hard maple - 44 lbs/ft3 - hardness 1450 - rupture 15800 - crushing 7830 - elastic 1830000 - non durable to perishable. Can burn when cut (routed) can blotch when stained. Fairly easy to work. white oak - 47 lbs/ft3 - hardness 1350 - rupture 14830 - crushing 7370 - elastic 1762000 -  black stains from water ingress - very durable, shrinks a lot but good workability, steams well. Avoid iron contact (can react) iroko - 41 lbs/ft3 - hardness 1260 - rupture 12700 - crushing 7840 - el

Filleting and filling

Image
Spent a bit of time today filleting the false floor join. I'm pretty happy with how they came out - cut of the end of a syringe to dispense a fairly thick mixture of 403 + Epoxy. Used the squeegee cut to a 85degree angle with the rounded corner to set the fillet. Worked out okay. Mix was two pumps each 105+205 and three and a half heaped teaspoons of filler. Used the left over mix to fill a few gaps around the edges of the deck. Also cut out the slot for the centreboard. I'd marked out roughly where the slot was before gluing the floor and drilled a speculative hole in the middle to see if things had moved much - they hadn't. Have a little more deck glue join filling to do (using a mix of epoxy and sawdust from the top layer of the ply) then going to make the gunwhales - probably out of maple but TBD up to the point I buy the wood. Will get an 8' foot length and scarf the outer lengths.

Glued the decks on.

Image
Started work early today and skipped a lunch break. Took three 15 minutes breaks to slap on sealing epoxy coats to the undersides of the decks then stopped work early to throw them on. Gluing took longer than expected, mainly because the foredeck took a while to get the edges weighed down. Lots of bricks and some rope and then duct tape. The tape was the real solution. Backtracking a little, before strapping the decks down I needed to make a decision on chainplates on or off. I did a few trial runs at putting the washers and nuts on through the access panels. It's tricky but I was able to without being on the deck so I left them off when gluing the deck. During my trail runs I did drop the spanner inside the boat and found how hard it will be to retrieve with the decks on.... so lets not do that! Okay. Back to the decks. My better half is away so I had the kids, soon as they were read to and on the way to sleep I was getting those bricks off and putting the

Carbon under the floor, floor glued to boat

Image
Laid down some carbon on the floor this morning. One more coat of epoxy this afternoon (the third) then plan to glueing in place tonight. This was the first time I've used CF cloth and I approached it as if it were glass. As this section won't be seen I didn't vacuum bag it or even use peel ply. In fact I even used 2nd grade cloth, where you can expect small runs that are visually apparent but don't reduce strength. Future applications are going to be stricter. I found the carbon hard to handle. Fragile around the edges and prone to movement. In the end I used a roller technique always pulling away from my original wet out. Once wet I squeegied hard to try and get it to penetrate. It seemed quite hard to get the epoxy to penetrate the cloth. Just as with a glass application I taped the edges and cut away the excess when the epoxy got to the tacky stage. The floor is placed over a wood spine and clamped at the edges so that its roughly matching the sha

More couldn't wait

Image
Did a rough cut on the false floor this morning.

Self presents and couldn't wait

Image
The ply came this morning, I was expecting it on Monday so this was a pleasant surprise. As I had one last task on the hull (adding doublers to support the forward end of the side decks) I churned through that and this evening cut out the deck pieces. It's still going to be a few days before I can seal the undersides and glue them down but nice to have them nearly ready to attach. The other thing that I've got my fingers crossed over is I think I can make the false floor out of one sheet of plywood with no scarf joint. The ply sheet is just over 8' in length and I *think* I'll have a half inch to spare.... The other present that came today was my carbon. The tube that's going to connect the hull sides looks sick!

Shout out to Forest Plywood

This is the second time I've bought plywood from Forest Plywood . The first time we drove down to National City to pick up (they are based in LA but have a distribution centre just south of San Diego). This time I paid for delivery. Ordered yesterday and turned up today! Perhaps the cool thing about living just off their delivery route to National City.

Last phase of major construction about to start

Image
Despite a week of distraction (see my other boat ) I got a few minor jobs done and finally ordered the last two ply sheets for the deck and the carbon for the deck and foils. I may actually have enough carbon for the gantry setup too and ordered a 1" pipe to connect the transom together and hang the gantry from. The minor jobs included mounting the chainplates and cutting away some of the extra bulkhead so that there is a chance to access the back of the chainplates through the inspection hatch. I also wimped out and added a small amount of support for the mainsheet block in the form of two cedar doublers on the girder. This is because I may go with a four screw block and the screws would be near the edge of the girder. The plan for the weekend is to cut out the rest of the card templates for the deck, and to start the centreboard. I now have an approximate plan on how to get the shape right but some trepidation too! Will need to get my hands on some vacuum bag

More cardboard - starting on the deck

Image
Made a cardboard template for the lower rudder mount, then bought some more cardboard and laid out the deck. I used a wood batten on measured offsets to get the edge curve. Lower rudder mount. Using a slight shim to lift the tail a bit, hopefully out of the stern wave. Deck template in place.

Bits 'n Bobs

Image
Haven't got the plywood for the decks yet so just playing around with a couple of bits 'n bobs. Added some high density filler to the kicker area and drilled through it. The wood clamped in the middle below is to allow me to maintain pressure on the filler while it sets. The clamps on the sides are holding the backing support for the inner gunwhale hardware mounting (I think mainly cleats for control lines). The kicker has backing plates on both sides. This should be strong enough I think. Next up I need to order a couple of sheets of ply and some carbon. For the underside of the deck I'm going to use 200g "2nd quality" carbon , this is a lot cheaper (17$ a yard for 50" sheets) but might have visual defects. For the visual carbon parts (the fins, the rudder gantry and various deck fittings) I'll use something without defects that is also a little more expensive. The last carbon part I'm looking at is a tube acros

Album