Posts

Showing posts from March, 2018

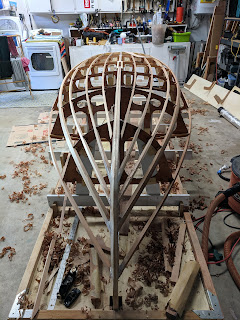
Six hours of sealing

Okay. I snuck in a bit of filleting too but basically six hours to seal the stringers. Three hours on the first night. Two hours on the second night for the second coat. An hour tonight for the bits I'd missed and a little sanding and touch-up. But my back survived and it's got to be said it's pretty satisfying when the epoxy becomes smooth and shiny. Ready to start adding ply to the bottom then. I'll admit to being a bit wary of this step, but once again, a few hundred people have managed this before me so it'll prolly just work right?

Just a litte 'poxy...

Image
First coat of sealer (epoxy or 'poxy as Wyn puts it) on the stringers, chines and gunwhales tonight. Not the outer edges where it's going to glue to the ply sheets but the exposed inner sides. Went in thinking this would take about forty minutes give or take and started just after 9pm. Finished after midnight. Not even sure I did a good job. Did manage to fill a few gaps that I wasn't happy with. Hopefully the second coat tomorrow night goes on quicker. Wonder if I should have rolled and tipped.

Fairing

Image
Spent the last few days fairing the chines and stringers to match the template. I was pretty nervous about this stage and I guess am still a little worried (and will be until the next worrying thing comes along) but overall it seems to have been quite straightforward. And I'm very impressed at how the Farr 3.7 design has everything setup, very nicely planned out! Basic approach when fairing is to plane down the top sides to match the curve template photographed in the previous post. In the end this is fairly easy because the notches in the laser cut frames are accurate enough that they guide you. Before I attach the first ply sheet I'll do a final check but I'm ready to cleanup and seal the stringers. Fun times making a nice little mess. Team #431 in action. Before sealing I filed/planed/sanded the bottom (top) side of the stringers. My thought here is the sealer will last longer with a smooth corner to attach over. Probably pointless and would have

Catch up....

Image
Family in town for a couple of weeks so I've slacked off on updates but managed some progress still. After the steaming pipe failed me I decided to have another go using a bag technique. Rather than purchase a proper plastic pipe I cut the end off one of my dust drapes and taped it with masking tape. This was an experiment but with some clamps to help the tape hold actually worked well enough that I used the same experiment on the four remaining pieces. Basic approach is to inject the steam and as the wood starts to get floppy pull it into shape. Then clamp and leave steaming hot for about an hour. After that walk away and do something else for 24 hours before removing the pipe. Finally let your wood dry for a couple of days before you glue it. One thing I should mention is it's worth cutting the front first then the aft sections after where they join the transom as these are easier cuts. I didn't do that.... For the chines and gunwhales I shaped the blocks they

Chine Steaming Failure

Image
John came round to try some of this boat building nonsense and together we approached the chines. Having steamed each piece for about an hour and a half we clamped them in place and I left them for a couple of days. If you look closely you'll see I cut the port side one a bit short - will be able to fill the gap with a little shim when I'm done. One thing to note was we needed to bevel the blocks on frames #1, #2 and #3 to get the chines to sit tight. Otherwise you have this gap: Sadly when I finally came to unclamp / untie them though they just sprung out with hardly any shape remembered. So now I'm in recovery mode. Second steaming attempt, this time I'm bagging one side at a time, filling the bag with steam and doing this for an hour more even after the pieces are clamped in place (still in the bag). Fingers crossed tomorrow I'll declamp and find the shape is a bit closer to that desired. Certainly the wood was kept pretty hot and

Album