Posts

Showing posts with the label carbon fibre

Next round of improvements

Image
Had another sail, this time with some wind. Still not on the wire though (I blame my weight, well, also the wind). Almost capsized a couple of times due to slips, or messing up with the long tiller extension. Came back with a few more projects. My hands were weak after three hours of sailing, and my legs bruised (find myself kneeling a lot in lighter air). [ Done ] Rework outhaul so it doesn't rub against the vang [ Done ] Raise the trapeze rings so I can crouch/wire in lighter air [ Done ] Improve travel on the vang, I two blocked it at one point [ Done ] Add ratcheting block to the mainsheet system Add non skid to a couple of sections Seriously consider foam pads in areas on the deck! In general though my first set of improvements (mainly the new smaller lines!) worked well. Some of this is already done. New lines to the left below, old to the right. MUCH cleaner now! The new sleeve on the boom worked well, though it may need some reinforcements ...

Beta testing

Image
Sail four coming up tomorrow but again looks likely a light air affair. Fingers crossed a little more puff than last weekend.... Did a few projects based on my first sailing. 1) Going to extend the rudder hinge to go through the tiller to speed up rig and de-rig. Because this will weaken it a bit in an already weak zone I'm first going to add a reinforcing sleeve. This project will go into the next week but at the end of it I'll be able to remove the rudder without taking the tiller off. I also decided to add a boom sleeve to stop the mainsheet snagging my neck. Couldn't see any off the shelf ones so ordered some sail material (both see through and dacron for edging) and double sided tape from SailRite. This made a pretty nice sleeve we'll see how long it lasts. Perhaps most importantly I reduced all the control lines from 1/4" to 5/32". These match the blocks and run a LOT better. Given that I also swapped back to low friction ring...

The Doctors In the House

Image
I'd heard that a stethoscope can be useful when vacuum bagging but finally got to use one. I had a leak in the most complicated piece I've bagged yet and was getting confused as to its location because the sound of air rushing through the back was distracting. Lucky my daughter has a scope - think it dates back to her being a sick baby but these days it lives in her dress up clothes. Using it got me down to the leak right away and with a full seal the piece came out great! And then all squished down Walk on the pier, with an audience later.... And the rudder box came out better than I'd expected for such a complicated piece. Still planning on a second  (well third) full layer of carbon I also took a moment to sand the inside of the dagger board case. This took down the main bumps and the daggerboard fit much better afterwards. I resealed and hopefully it still fits after that!

Rudder box

Image
With the gantry in place it was time to start building the lifting rudder head mechanism. Lifting firstly because I have kids and there is a beach in the harbor at low tides. Secondly because there are some lakes and bays I plan on sailing from where it will come in handy. This piece gave me some angst but with it 70% complete now I'm fairly confident it'll work well enough to get me sailing. My assumption is I'll be rebuilding some areas once we start sailing but really hoping to focus on the foils. As with most of Farrout I approached this with a mixture of 4mm mahogany ply, cedar and carbon / glass / epoxy. It all starts with a dry fit. Epoxied in some cedar Checking rudder fit Checking fit against the gantry Testing fit with both sides against the rudder. Some reinforcement on the rudder Bagging the rudder box Starting to get there. The tube on top was made by wrapping some carbon around the 1" carbon tube I...

Rudder gantry

Image
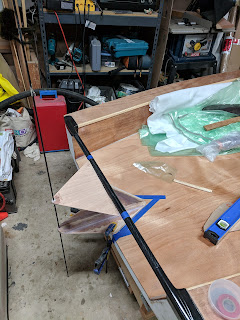
Been off the blog for a while but making slow progress on the boat. The rudder gantry took some elbow grease and I made a few mistakes but the final structure seems robust and I think it looks pretty stylish. Dry fit (the vertical line is a 3/16th inch rod used to test vertical alignment) Happy with that I got on with some vacuum bagging. Pretty happy with the end result, not perfect but I'm learning! Glued in place.... Once in place I tabbed the different parts together. Should be pretty bullet proof. Feels pretty comfortable to pick the boat up by any of the parts involved.

Foils mostly complete and working on the rudder gantry

Image
Not the biggest fan of my foils but they'll get me sailing. Need a little more finishing before they are done done but rudder and centreboard both at the 80% stage - hopefully really 80% and not the final 20% taking another 80%.... The rudder gantry is taking shape. I've epoxied a carbon tube across the transom and am building up a ply extension that will be carbon skinned to make a bullet proof and fairly light / elegant structure at the back of the boat.

Carbon under the floor, floor glued to boat

Image
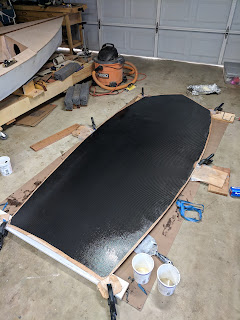
Laid down some carbon on the floor this morning. One more coat of epoxy this afternoon (the third) then plan to glueing in place tonight. This was the first time I've used CF cloth and I approached it as if it were glass. As this section won't be seen I didn't vacuum bag it or even use peel ply. In fact I even used 2nd grade cloth, where you can expect small runs that are visually apparent but don't reduce strength. Future applications are going to be stricter. I found the carbon hard to handle. Fragile around the edges and prone to movement. In the end I used a roller technique always pulling away from my original wet out. Once wet I squeegied hard to try and get it to penetrate. It seemed quite hard to get the epoxy to penetrate the cloth. Just as with a glass application I taped the edges and cut away the excess when the epoxy got to the tacky stage. The floor is placed over a wood spine and clamped at the edges so that its roughly matching the sha...

Album