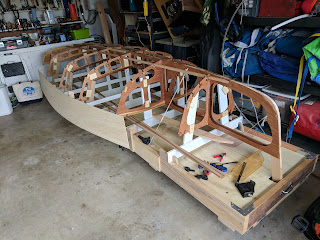
Posts

Showing posts from February, 2018

More stringers!

Image
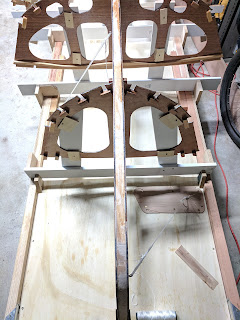
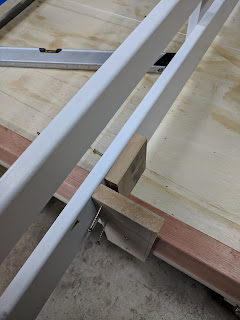
On a roll now Another trip down to TH&H and I had enough cedar for the rest of stringers, chines and gunwhales. With some windy days I had to wait until there was a calm spot or the dust would go all over the garage. Sorry neighbors that's why I was table sawing at 8:15am on a Sunday! The lesson I learnt on the second set of stringers was that when you twist at the bow the stringer needs to be pulled in the opposite direction at frame #1 (I originally setup to twist the other way). Streaming the cedar for my hour and twenty gets it nice and soft. Not sure that'll work with the chines though they are a lot beefier.  Also my single support in the middle of the ABS pipe isn't enough. It's sagging. Guess I'll try two then and one will go in the middle of the main sag. Scroll to the bottom to get a visual on the level of twist needed up front. This is slightly over twisted but will spring back a little when released. Next set steam

Shaping the stem part II

Image
Looking at the stem again today the basic shape seems good but it needed a bit more work to get the right angle for the ply to glue on. How to get the right angle for the ply? [Note I won't know until I bond the ply, but I have some confidence]. Here's the oracle himself (Tips from a Shipwright is an amazing set of videos!).

Shaping the Stem

Image
From years ago I have a 50% share in a Clark Foam modified Hitachi power planar. This was designed for foam surfboard shaping but tightening down the adjustment and it did seemed to work pretty well on the stem. Final shaping was with hand planes and sandpaper. Will take another look at it in the morning but its pretty close to good enough. Definitely a fun little project!

Scarfing stringers

Image
Before moving on I built a bumper for the boat. It's a little annoying but I was catching on the frames a lot so I think this boat build diaper should help. With that in place I returned to scarfing. This meant removing the very useful "thin rip" guide from my table saw.... And replacing it with my scarfing sled jig built back when I was getting ready to start construction. The little wedges allow for different wood thicknesses. Having used the jig I'm now 1) happy with it and 2) feeling it needs an addition - an adjustable vertical clamp that holds the wood secure against the blade. As it stands it worked. Pause for a sunset And glue and clamp. Heading down to North Sails to pick up my big boat spinnaker (sailing367.blogspot.com) and going to chat about sails for a 3.7. Funny that, my big boat being a 36.7 Farr designed Beneteau and here I am on a 3.7m Farr Designed home build.

Stringers started, and a snafu

Image
First two stringers are glued. Sadly while doing this I bent one of the frames hanging out. Easy fix but annoying and reminded me of my general intention to make a bumper. So rather than starting scarfing the next set today (would be my first scarf joint and I'll admit to being a bit worried about it) I glued up bits for a bumper.

Girder glued in place, met my self imposed deadline

Image
I wanted to be onto the stringers by today and I sort of am. Glued the girder in place yesterday. Lots of glue and clamping. Came out okay. Today I managed to do some cleanup - a fair few major dribbles involved but the joins were pretty well filled and the boat seems fairly straight. When I was sanding my transom down I took the centre a bit too far. In an effort to make it smoothly curved I missed the fact that the centre stands a little proud of the general curve. Now that the girder is glued in place I'm building this back up again. Hopefully gravity will pull this gooey mess just flat enough but not flatter than it needs to be and the final sand will be easy. So what about those stringers?  Well, I borrowed Jeff's of the other Farr (currently nearly complete on his girder but distracted by his big boat) planar. And planed my cedar down to the 3/4" thickness needed for the stringers. So they are started :) Amazing machine that s

Prepping for Girder Gluing

Image
Not a huge amount of progress on FarrOutMan (? maybe) today, having a lay day playing some touch rugby and a first father daughter dance which mainly involved looking like a lemon while my daughter ran around with the friends. Did get to experiment with a little rig to straighten a slight bend in the girder (it's only out but a couple of mm at most, but still...). Theory is the strings will be inside the chines and provide just enough support to hold the girder in exactly the right position while everything glues around it. Seems to work. I also filletted the inside top of the girder and added a little extra sealant to a few other spots. Ready to glue tomorrow.

Mounting the Frames Part III

Image
Exciting day today. I continued fixing up the inconsistencies in the frames and fairly quickly got to a stage where I trusted a dry fit of the girder. Along the way I needed to adjust a couple of frames a couple of mm to the side, this being tricky with the block pattern I had I came up with a fairly neat solution that allowed side to side adjustment. This photo shows the screws used to adjust the offset, on the other side I added spacers behind the vertical. This was added to three frames and it was time for a dry fit. About 30 seconds in I hit my next snag. The plans called for a half in space on the #4 frame which I'd assumed allowed for the CB doubler. It's possible that actually the CB doubler was meant to stop prior to the bolt (and only bolt through the ply skins). Even with hindsight it was a bit tricky to tell. Anyway, cutting the frame doublers back a bit extra allowed them to clear the bolts.  Blimey it suddenly looks a bit like a boat! St

Mounting the Frames Part II

Image
Got all the frames mounted on the building box. In my mind I'd been expecting a few hours (meaning a couple of days) of adjustment to get them straight but blargh I have to admit some disappointment at how far out my supports were. As I was having difficulty eyeballing which frames were out I added a second string down the centreline. This makes things clear as day. Frame #1 is a joke, Frame #4 which should have been setup when I was getting the hang of things is significantly off centre too (and actually its off vertically too now I come to remeasure it). Despite it getting late I remounted #1. Didn't take long to get a much better attempt. Frame #4 will get remounted tomorrow. And then I'll continue adjusting the others to get everything straight enough for a dry fit of the girder. Won't be sniffing a stringer until the weekend for sure!!! Take away thoughts: Second string on centre line is awesome Needed to do a better job with the initial layo

Frames moving to the build box

Image
Putting the frames onto their supports was a little fiddly as expected. A mockup girder helped set the centre line and I learnt to clamp blocks to the workbench at the expected locations to help set them up reliably. Once one side was set I simply then copied the measurements from the side with the plan to the other side. Frame #5 proved the trickiest. I suspect that my frame deviates from the plan by about 1mm. In the end I made the bottom accurate and think the top will come good when the stringers are attached as they end up being the ply skin bearing surfaces. And with this finished last night this morning I got to attach frame #1 to the base and started on #2. Going to take a few hours to be satisfied that all is straight but with the string down the centre and a straight box this is just a nudge here and a nudge there and possible a shim here and a shim there until satisfied. In my "learning to work with MDF" today's lesson is predrill your screws even i

Mounting The Frames

Image
The frames get mounted onto the build box (also known as a strong box) temporarily screwed onto a set of mdf (or other dimensionally stable material) forms. I'd never used power tools on mdf before. What a mess. It just dissolves into a fine dust. Worth taking some precautions. My expectation is to spend most of this week going through this process. At the end of it the boat will be in its final shape for the first time just in skeleton form and the long process of filling in the gaps will begin. Getting the frames setup exactly to measurement is critical, and I'll admit to being a bit scared, though worst case when double triple quadruple checking I'll find the mistake and just have to unscrew things and do it again. The plans come with a plastic template that shows offsets from the baseline that the build box provides. I set this up with a straight edge along the baseline to work from. Prior to this step I'd worked out the approximate lengths of all the m

Setting Up The Frames

Image
With the grider done it was time to move onto the frames. First step was 46 inchish long pieces to back the stringers, along with some longer pieces for the chines. Being lazy I went with four cuts at a time to speed things up. Worked a charm. The tops of the frames are a bit more complicated. I decided to laminate the #2 beam under the fordeck from a combination of Cedar (light) and Spruce (strong). Partly this was because I had the offcuts available and partly because I wanted to try some lamination. For the cockpit deck supports I just steamed Cedar. To get the curve I attached blocks to a sheet of ply, built a steamer from some 3" ABS pipe (5' for this part but with another 8' I can attach later for the stringers and chines) and a wall paper steamer. Once steamed I clamped the wood to the template and left it for a while. My initial results steaming weren't that great so I insulated the setup, added a thermometer and added some cross beams to lift th

Album