Posts

Showing posts with the label stringers

Six hours of sealing

Okay. I snuck in a bit of filleting too but basically six hours to seal the stringers. Three hours on the first night. Two hours on the second night for the second coat. An hour tonight for the bits I'd missed and a little sanding and touch-up. But my back survived and it's got to be said it's pretty satisfying when the epoxy becomes smooth and shiny. Ready to start adding ply to the bottom then. I'll admit to being a bit wary of this step, but once again, a few hundred people have managed this before me so it'll prolly just work right?

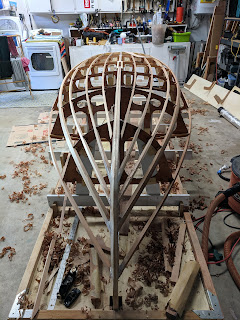
Just a litte 'poxy...

Image
First coat of sealer (epoxy or 'poxy as Wyn puts it) on the stringers, chines and gunwhales tonight. Not the outer edges where it's going to glue to the ply sheets but the exposed inner sides. Went in thinking this would take about forty minutes give or take and started just after 9pm. Finished after midnight. Not even sure I did a good job. Did manage to fill a few gaps that I wasn't happy with. Hopefully the second coat tomorrow night goes on quicker. Wonder if I should have rolled and tipped.

Fairing

Image
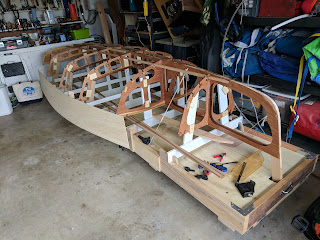
Spent the last few days fairing the chines and stringers to match the template. I was pretty nervous about this stage and I guess am still a little worried (and will be until the next worrying thing comes along) but overall it seems to have been quite straightforward. And I'm very impressed at how the Farr 3.7 design has everything setup, very nicely planned out! Basic approach when fairing is to plane down the top sides to match the curve template photographed in the previous post. In the end this is fairly easy because the notches in the laser cut frames are accurate enough that they guide you. Before I attach the first ply sheet I'll do a final check but I'm ready to cleanup and seal the stringers. Fun times making a nice little mess. Team #431 in action. Before sealing I filed/planed/sanded the bottom (top) side of the stringers. My thought here is the sealer will last longer with a smooth corner to attach over. Probably pointless and would have ...

Catch up....

Image
Family in town for a couple of weeks so I've slacked off on updates but managed some progress still. After the steaming pipe failed me I decided to have another go using a bag technique. Rather than purchase a proper plastic pipe I cut the end off one of my dust drapes and taped it with masking tape. This was an experiment but with some clamps to help the tape hold actually worked well enough that I used the same experiment on the four remaining pieces. Basic approach is to inject the steam and as the wood starts to get floppy pull it into shape. Then clamp and leave steaming hot for about an hour. After that walk away and do something else for 24 hours before removing the pipe. Finally let your wood dry for a couple of days before you glue it. One thing I should mention is it's worth cutting the front first then the aft sections after where they join the transom as these are easier cuts. I didn't do that.... For the chines and gunwhales I shaped the blocks they...

More stringers!

Image
On a roll now Another trip down to TH&H and I had enough cedar for the rest of stringers, chines and gunwhales. With some windy days I had to wait until there was a calm spot or the dust would go all over the garage. Sorry neighbors that's why I was table sawing at 8:15am on a Sunday! The lesson I learnt on the second set of stringers was that when you twist at the bow the stringer needs to be pulled in the opposite direction at frame #1 (I originally setup to twist the other way). Streaming the cedar for my hour and twenty gets it nice and soft. Not sure that'll work with the chines though they are a lot beefier.  Also my single support in the middle of the ABS pipe isn't enough. It's sagging. Guess I'll try two then and one will go in the middle of the main sag. Scroll to the bottom to get a visual on the level of twist needed up front. This is slightly over twisted but will spring back a little when released. Next set steam...

Scarfing stringers

Image
Before moving on I built a bumper for the boat. It's a little annoying but I was catching on the frames a lot so I think this boat build diaper should help. With that in place I returned to scarfing. This meant removing the very useful "thin rip" guide from my table saw.... And replacing it with my scarfing sled jig built back when I was getting ready to start construction. The little wedges allow for different wood thicknesses. Having used the jig I'm now 1) happy with it and 2) feeling it needs an addition - an adjustable vertical clamp that holds the wood secure against the blade. As it stands it worked. Pause for a sunset And glue and clamp. Heading down to North Sails to pick up my big boat spinnaker (sailing367.blogspot.com) and going to chat about sails for a 3.7. Funny that, my big boat being a 36.7 Farr designed Beneteau and here I am on a 3.7m Farr Designed home build.

Stringers started, and a snafu

Image
First two stringers are glued. Sadly while doing this I bent one of the frames hanging out. Easy fix but annoying and reminded me of my general intention to make a bumper. So rather than starting scarfing the next set today (would be my first scarf joint and I'll admit to being a bit worried about it) I glued up bits for a bumper.

Girder glued in place, met my self imposed deadline

Image
I wanted to be onto the stringers by today and I sort of am. Glued the girder in place yesterday. Lots of glue and clamping. Came out okay. Today I managed to do some cleanup - a fair few major dribbles involved but the joins were pretty well filled and the boat seems fairly straight. When I was sanding my transom down I took the centre a bit too far. In an effort to make it smoothly curved I missed the fact that the centre stands a little proud of the general curve. Now that the girder is glued in place I'm building this back up again. Hopefully gravity will pull this gooey mess just flat enough but not flatter than it needs to be and the final sand will be easy. So what about those stringers?  Well, I borrowed Jeff's of the other Farr (currently nearly complete on his girder but distracted by his big boat) planar. And planed my cedar down to the 3/4" thickness needed for the stringers. So they are started :) Amazing machine that s...

Album