Fairing
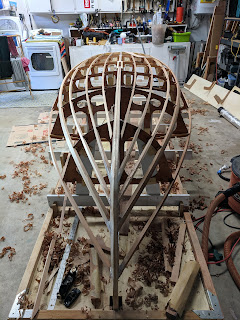
Spent the last few days fairing the chines and stringers to match the template.
I was pretty nervous about this stage and I guess am still a little worried (and will be until the next worrying thing comes along) but overall it seems to have been quite straightforward.
And I'm very impressed at how the Farr 3.7 design has everything setup, very nicely planned out!
Basic approach when fairing is to plane down the top sides to match the curve template photographed in the previous post. In the end this is fairly easy because the notches in the laser cut frames are accurate enough that they guide you.
Before I attach the first ply sheet I'll do a final check but I'm ready to cleanup and seal the stringers.
Before sealing I filed/planed/sanded the bottom (top) side of the stringers. My thought here is the sealer will last longer with a smooth corner to attach over. Probably pointless and would have been better to do this before attaching (Dave did something like this on a router).
I was pretty nervous about this stage and I guess am still a little worried (and will be until the next worrying thing comes along) but overall it seems to have been quite straightforward.
And I'm very impressed at how the Farr 3.7 design has everything setup, very nicely planned out!
Basic approach when fairing is to plane down the top sides to match the curve template photographed in the previous post. In the end this is fairly easy because the notches in the laser cut frames are accurate enough that they guide you.
Before I attach the first ply sheet I'll do a final check but I'm ready to cleanup and seal the stringers.
Fun times making a nice little mess.
Team #431 in action.
Before sealing I filed/planed/sanded the bottom (top) side of the stringers. My thought here is the sealer will last longer with a smooth corner to attach over. Probably pointless and would have been better to do this before attaching (Dave did something like this on a router).


Comments
Post a Comment