Posts

Foil thoughts

Image
Starting to do some research into foil shapes. The standard approach is to use NACA0010 / 0012 for the rudder and think about of the NACA six digit series for the daggerboard. Laminar flow sections are faster underwater, but have issues getting the water to flow at higher angle of attacks. As I sail in an often light air venue I may end up building two daggerboards, one nice and forgiving for light air sailing and the other aimed at higher speeds. http://airfoiltools.com/ provides some great comparisons of different sections. After some time spent in here I've pretty much discarded the idea of the laminar flow NACA section and am contemplating an RC sailplane section  EH 0.0/9.0 . A problem I hit pretty quickly was that my girder was build 2mm too thin. This then makes the daggerboard slot too thin! At the time I knew it was slightly too thin (but don't remember thinking as much as 2mm - so I don't think I thought about that properly) but didn't properly think th...

Fairing (first pass)

Image
FarrOut is going to get its hull fair in two stages. The first before applying glass cloth to get the basic shape smooth and the second prior to painting. Fairing is done with West System 407 light filler. If you don't normally wear a mask I'd highly suggest donning one for this stage as the material is very light and tends to puff out off the mixing bowl especially as the additive is a fine dust. I learnt a few tricks during this process. Firstly wet the ply with a wet (neat) epoxy coat before applying the thick mixture as it won't penetrate  the wood very well on it's own, but will chemically bond to the neat mixture you laid as a base. Secondly down strips of the fairing compound first. You can do this pretty roughly as they are easy to sand. Let them cure for a few hours and sand them down (see next tip) Notice that weird board sitting on the boat? That's my next tip! Make yourself a torture board. Mine is probably a little short the pros even b...

ITS A BOAT. (well, it's starting to look like one)

Image
Since I last posted things have been going at a whirl. I've promised I'll make a table this weekend so will have to slow down but I just ran out of epoxy anyway.... Anyway. Getting the bottom skin on was a scary step but it's been super fun. I've made mistakes sure but seem to have come out the other end in good shape. I'm pretty happy with the joins, everything seems pretty true and fairing seems likely pretty straightforward with just two main spots I've seen needing building up. Clamping the second bottom sheet Look at me with no clamps! Card template for the side Trial fit. Darth Vadar in the house! Gluing the first side panel And the second!

Back in the saddle - skinning the hull

Image
Family in town, a ruptured calf muscle and some extra work load kept farrout on the back burner for a bit. This was combined by having issues getting a decent ply sheet scarf joint.... But now we're back! I gave up on my scarffing jig. The third cut was better but not good enough. So I switched to an off the shelf west system scarffer. Success! With a bit of practice it now takes about 20 minutes to make a cut including setup, perhaps less. This was my first attempt. After some more wasted time I switched to the scarrfer. This shows the Marine sheet on the bottom with a sacrificial sheet above. The sacraficial sheet is a bit thick but the last little cleanup is easy by hand. And after investing in some more clamps I was able to glue the first bottom sheet to the boat. Worth mentioning that I steamed the front section. To do this I wrapped it in plastic and used the steamer. I'm half happy with this approach. There ended ...

Six hours of sealing

Okay. I snuck in a bit of filleting too but basically six hours to seal the stringers. Three hours on the first night. Two hours on the second night for the second coat. An hour tonight for the bits I'd missed and a little sanding and touch-up. But my back survived and it's got to be said it's pretty satisfying when the epoxy becomes smooth and shiny. Ready to start adding ply to the bottom then. I'll admit to being a bit wary of this step, but once again, a few hundred people have managed this before me so it'll prolly just work right?

Just a litte 'poxy...

Image
First coat of sealer (epoxy or 'poxy as Wyn puts it) on the stringers, chines and gunwhales tonight. Not the outer edges where it's going to glue to the ply sheets but the exposed inner sides. Went in thinking this would take about forty minutes give or take and started just after 9pm. Finished after midnight. Not even sure I did a good job. Did manage to fill a few gaps that I wasn't happy with. Hopefully the second coat tomorrow night goes on quicker. Wonder if I should have rolled and tipped.

Fairing

Image
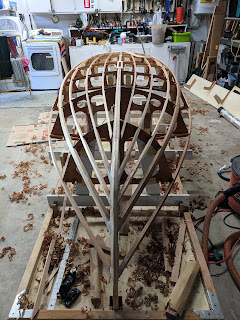
Spent the last few days fairing the chines and stringers to match the template. I was pretty nervous about this stage and I guess am still a little worried (and will be until the next worrying thing comes along) but overall it seems to have been quite straightforward. And I'm very impressed at how the Farr 3.7 design has everything setup, very nicely planned out! Basic approach when fairing is to plane down the top sides to match the curve template photographed in the previous post. In the end this is fairly easy because the notches in the laser cut frames are accurate enough that they guide you. Before I attach the first ply sheet I'll do a final check but I'm ready to cleanup and seal the stringers. Fun times making a nice little mess. Team #431 in action. Before sealing I filed/planed/sanded the bottom (top) side of the stringers. My thought here is the sealer will last longer with a smooth corner to attach over. Probably pointless and would have ...

Album