Posts

Rudder Pt II (III and IV to come I guess)

Image
" Hopefully can finish up fairing tomorrow" I said, four days ago! Turn out that the I beam mod took a lot more sanding and reshaping to get back to a good shape, probably about four hours total with three layers of epoxy filler in there. But finally it's ready to skin again.... That join isn't great but hey most of these are cored in foam the strength will be in the three layers of carbon cloth the top part of the foil is going to end up with.

Repairing the rudder

Image
Having decided to repair the rudder step one was to get the main stock rebonded. To do this I embedded two pieces of spruce. Rather than sand down the prior paint I decided to just pull off the carbon skin. This pulled the top layer of the spruce too leaving it pitted and rough so I filled the whole top. With it looking like a rudder again I sawed it into two pieces.... This is in order to work towards the final aim of both restoring the shape and also making the foil a LOT stronger than it was before. Aims are: Remove that big hole. It was way too big! Instead bond the down-haul into a smaller hole. Turn the foil into an I beam with carbon cross sections Thicken up with carbon skin from plan 1 Cutting the foil in half was a prep step towards step 2. To finish up I added two layers of carbon with an ash strip (about 1/8" thick) to replace the wood removed in the cut. Hopefully can finish up fairing tomorrow and get the foil skinned...

Last thing on the list... break it

Image
I had a scrappy piece of paper with my final "get it on the water" checklist and Vida added her own item.... I'd always joked with the kids that Farrout would get broken and repaired many times, partly just to get them used to the idea that this was fine (like capsizing, or falling off your bike). Anyway.... To work off some Jetlag I took Farrout for  a lovely winters day sail. By the time I got on the water the wind had died down a bit from it's midday peak but it was still strong enough to have us skipping across the harbor. First things first I needed to do was test some of the changes I'd made. Improvements to rigging setup:  Great! Fast setup of shrouds, quick attachment of rudder, boat breaker line just the right length. Took 20 minutes to rig and next time will be quicker as it's tuned already! New Zhik sea boots: Comfy, but not the extra grip I was hoping for. Going to have to extend the foot rests higher to get better purchase I think....

Upgrade to control lines

Image
One big annoyance from my first few sails has been the combination on continuous lines and rail mounted cleats. The cleats are uncomfortable to sit on and much worse kept coming uncleared. The main cause of uncleating being over exuberant use of the continuous lines pulling on the backside of the far cleats. Once the cleats on the rail are undone you have to reach them to recleat, likely a problem as your weight goes to the wrong place. Looking at rigging pictures I found images of Daryl’s Farr on face book where the cleats were centerline and led through eyes at the rail. This seemed to fix all my primary issues so I decided to copy.  Original layout: Removed and holes filled. Also marked out an extra area for more non skid: At this point I commented on Daryl’s picture and he replied that he no longer ran lines through the eyes, but instead to low friction rings on elastic. As I thought about this made a lot of sense as it would allow more control from outboa...

Sailing Vid!

Image
Some light air sailing from last weekend.

Next round of improvements

Image
Had another sail, this time with some wind. Still not on the wire though (I blame my weight, well, also the wind). Almost capsized a couple of times due to slips, or messing up with the long tiller extension. Came back with a few more projects. My hands were weak after three hours of sailing, and my legs bruised (find myself kneeling a lot in lighter air). [ Done ] Rework outhaul so it doesn't rub against the vang [ Done ] Raise the trapeze rings so I can crouch/wire in lighter air [ Done ] Improve travel on the vang, I two blocked it at one point [ Done ] Add ratcheting block to the mainsheet system Add non skid to a couple of sections Seriously consider foam pads in areas on the deck! In general though my first set of improvements (mainly the new smaller lines!) worked well. Some of this is already done. New lines to the left below, old to the right. MUCH cleaner now! The new sleeve on the boom worked well, though it may need some reinforcements ...

Splicing overview, and D-Splicer FTW

Image
I've been splicing lines for years now from a first rough double braided eye slice years ago ( this video was my tutorial, dude is awesome!). Mainly these days I find myself working with stripped lines for lightness and just accept that I need to resplice every so often. The difference is the splice used - a brummel lock splice - takes less than ten minutes to complete - in the video linked it takes three and a half minutes but then you need to whip them to stop the tail working loose. Splicing is something I often do watching TV in the evening. Anyway, I digress! For Farrout I've been doing three types of splice: The brummel lock splice for line segments in the vang, downhaul, outhaul and also the mainsheet end. Locked brummel loops (see this hammock video ) to attach blocks Continuous Control line splices like in this video , so that my lines don't have ends. Over the years I've moved from my original aluminum fids to this stainless set by R...

Beta testing

Image
Sail four coming up tomorrow but again looks likely a light air affair. Fingers crossed a little more puff than last weekend.... Did a few projects based on my first sailing. 1) Going to extend the rudder hinge to go through the tiller to speed up rig and de-rig. Because this will weaken it a bit in an already weak zone I'm first going to add a reinforcing sleeve. This project will go into the next week but at the end of it I'll be able to remove the rudder without taking the tiller off. I also decided to add a boom sleeve to stop the mainsheet snagging my neck. Couldn't see any off the shelf ones so ordered some sail material (both see through and dacron for edging) and double sided tape from SailRite. This made a pretty nice sleeve we'll see how long it lasts. Perhaps most importantly I reduced all the control lines from 1/4" to 5/32". These match the blocks and run a LOT better. Given that I also swapped back to low friction ring...

And.... BEEN SAILING!!!!

Image
There was one last piece to the puzzle, a license plate for the trailer. With the holiday season the DMV took an extra couple of days and next thing you know I was on a family trip to Atlanta. On my return I drove from the Airport to pick up the plates, attached them to the trailer and by mid afternoon was somehow magically sat becalmed and waiting for a puff.... Eventually it came and Farrout and I took a trip across the harbor. It was a bit of a mess to be honest, sail all out of shape and tacks a mess as I tried to find out how to get my body across the boat with the extension in the right place and that pesky mainsheet still attended to. That was Friday. On Saturday I went out again with a bit more breeze but still no trapeze and John Wilson in an FJ to run against. We skootled out past the seals on the outer buoy and generally worked up and down wind. By the end I was feeling more comfortable. Sunday, I took another sail. This was a quick sail post Christening ceremony (de...

Final bits 'n bobs

Image
Mounted the dolly on a RightOn trailer. Added a mast mount to keep it clear of my car Hoisted a sail for the first time And..... ready to sail...

Getting boat like

Image
Got out of the Garage and had a wash off. That salt was well encrusted though a fair amount remained. Took a break on the bigger boat.... Then put the mast up. There's a T prop at the bottom here to allow me to rotate it up while solo with a line on the transom to hold in place while I figured out the line lengths. Also got some decals!

Non skid decking

Image
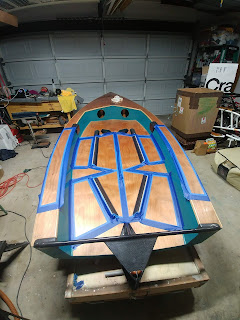
For non skid decking I added a final layer with some large crystal Kosher salt Came out quite nice. Originally I was thinking to keep the clear varnish finish but in hindsight seeing the non skid areas seems quite useful and I'll probably add a second pass with a color you can see at some point. To test line lengths I propped the boom up and started to look at how things would fit together.

Hull Paint

Image
Starting to put the hull paint down. Used an Epifanes Yacht Enamel and to be honest had a lot of difficulty. A fair amount of this was definitely user error but at the end of the day I feel the final finish is a bit soft. I over sanded the chines a few times. Plus a few spots here and there. Took another pass at the hull paint. Came out much better. The main thing was to work the blending in between sections better, I rolled slower and tipped smaller sections. Still not perfect though - if I get competitive with this boat we'll be back here again. In fairness the color is AMAZING!!!

Fairing

Image
Started building up areas using a light to look for low spots The chines took a lot of work. If I got another go I'd round out the edge more before glassing, then just build up with filler.  Then took a break from the hull to work on the foils.

Album