Posts

Showing posts from February, 2019

The Doctors In the House

Image
I'd heard that a stethoscope can be useful when vacuum bagging but finally got to use one. I had a leak in the most complicated piece I've bagged yet and was getting confused as to its location because the sound of air rushing through the back was distracting. Lucky my daughter has a scope - think it dates back to her being a sick baby but these days it lives in her dress up clothes. Using it got me down to the leak right away and with a full seal the piece came out great! And then all squished down Walk on the pier, with an audience later.... And the rudder box came out better than I'd expected for such a complicated piece. Still planning on a second  (well third) full layer of carbon I also took a moment to sand the inside of the dagger board case. This took down the main bumps and the daggerboard fit much better afterwards. I resealed and hopefully it still fits after that!

Fitting the foils

Image
Hoisted Farrout on her side and did a dry run of rudder and daggerboard. The daggerboard is a very tight fit. Looking inside the slot there are a few epoxy runs that will help. It fits, just might be annoying to adjust on the water. The rudder is slightly offset. I think it was perfect and last night just before I called it a day I made one last tweak to the rudder axle and now it's offset. Going to leave as is, it's closer than my big boats rudder is and I may end up rebuilding the whole rudder and rudder box assembly anyway. There's a bit more gap at the top of the rudder than i'm happy with so I'm guessing going to fill it - pretty sure this will be in the top of the stern wave.

Rudder box

Image
With the gantry in place it was time to start building the lifting rudder head mechanism. Lifting firstly because I have kids and there is a beach in the harbor at low tides. Secondly because there are some lakes and bays I plan on sailing from where it will come in handy. This piece gave me some angst but with it 70% complete now I'm fairly confident it'll work well enough to get me sailing. My assumption is I'll be rebuilding some areas once we start sailing but really hoping to focus on the foils. As with most of Farrout I approached this with a mixture of 4mm mahogany ply, cedar and carbon / glass / epoxy. It all starts with a dry fit. Epoxied in some cedar Checking rudder fit Checking fit against the gantry Testing fit with both sides against the rudder. Some reinforcement on the rudder Bagging the rudder box Starting to get there. The tube on top was made by wrapping some carbon around the 1" carbon tube I...

Rudder gantry

Image
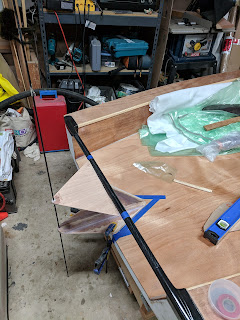
Been off the blog for a while but making slow progress on the boat. The rudder gantry took some elbow grease and I made a few mistakes but the final structure seems robust and I think it looks pretty stylish. Dry fit (the vertical line is a 3/16th inch rod used to test vertical alignment) Happy with that I got on with some vacuum bagging. Pretty happy with the end result, not perfect but I'm learning! Glued in place.... Once in place I tabbed the different parts together. Should be pretty bullet proof. Feels pretty comfortable to pick the boat up by any of the parts involved.

Album