Step 2: Build the girder!
You don't have to start with the girder but as the most complicated part of the core frame I wanted to get it out of the way. Along the line I made a few mistakes with recoveries that might help (see further down).
First things first, shape the stem (a jigsaw did a good job).
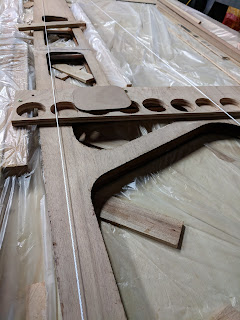
Move one was measure out the vertical offsets from the side of the build box and put blocks around the two ply sheets to hold them in place.
Then I glued in the stem and CB uprights next to give me some solid end points for the long horizontal pieces and started filling in the rest. Wood used was spruce for the stem, girder top and anything around the CB, lighter Western Red Cedar on all other pieces.


Once the girder was up, time for a dry fit!

First things first, shape the stem (a jigsaw did a good job).
Move one was measure out the vertical offsets from the side of the build box and put blocks around the two ply sheets to hold them in place.
Then I glued in the stem and CB uprights next to give me some solid end points for the long horizontal pieces and started filling in the rest. Wood used was spruce for the stem, girder top and anything around the CB, lighter Western Red Cedar on all other pieces.


I made mine in two pieces then glued together. Mainly because my building top isn't flat.... (see below)

Once together I quickly added the top layer and then setup strings to test for flatness and added shims until everything lined up.
My approach was to stretch the strings very tight, 4mm above the girder and use offcuts of the 4mm ply to make sure that space was maintained at all positions. This seems to have worked.


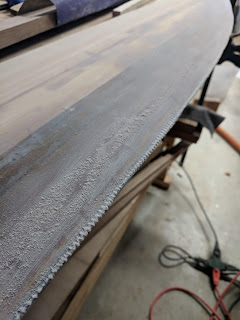
Once the CB area was glued up and everything had a couple of days to cure in it's nice straight state I pulled it off the box and - ignore the top piece that's sacrificial - the rest is straight!

Epoxy is an interesting substance. Provided you get the mixture right (p#ss easy with West System's dispensing pumps) it's very forgiving. For the first 6 hours it's very pliable with little shape memory but that grows over the following 24.
This glue had been sitting in the pot for about 6 hours when I pulled on the brush and perfectly inverted the whole layer.

Mistakes I made!
- I needed to cut a notch to allow frame #4 to sit in front of it's upright. Would have been easier to build this in but I read the plans wrong initially.
- Making the inside of the stem overlap the ply. This took a fair amount of awkward sanding to fix. Now I trust my use of jigsaw more I'd go closer and clean up the inner edge prior to gluing.
- The top sheet didn't quite bond properly in one place. It was held up by tiny columns of cured epoxy that I then cut, put a wax paper damn under the crack and injected with epoxy before reclamping. Fixed but a waste of an hour.
- I didn't cleanup the inside of the girder quickly enough and have some (unseen but annoying to me) lumpy epoxy bits remaining in there. They won't stop water draining, just would be better without them.
Once the girder was up, time for a dry fit!


Hindsight: Would use a thicker ply for the top sheet. I used 1/4" and it wasn't stable enough as a support. Think 1/2" MDF or even 3/4 would be a much better choice with less angst about getting a straight girder and likely a straighter girder. Even with my wedging mine is still a couple of mm out in one place, some of which should disappear when I attached the frames and the rest will be swallowed in the skinning but why mess around!
ReplyDelete